Thursday, December 1, 2011

Homemade holiday embellishments ...

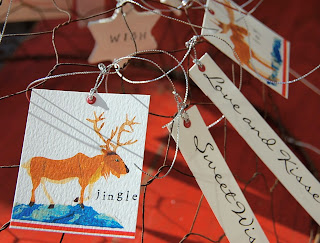
gift tags by Nelley Kelley

... 'tis the season for trying your hand at some homemade gifts and embellishments.  Each year I try to create all of my own gift tags, holiday cards and homemade gifts.  There is a satisfying feeling knowing that you can craft many of the things that you see in the stores especially paper items like cards, tags and wrapping paper.  It takes only a little time to gather your supplies and then you're off!  I love it when friends and family look forward to the wrappings each year and then repurpose them as bookmarks, framed prints, trinkets or their own gift toppers - It becomes a little gift to me!

Holiday Gift Tags by Nelley Kelley

I've printed out holiday sayings on lovely water color paper.  I've cut them out in a banner shape and then folded the top of the banner for a finished look.  Next, I punched a hole in the top and finished it with a tiny red grommet.  Lastly, string a little silver thread through the top and tie it on to your gift or slide it into a book gift as an added little something.

...more Nelley Kelley tags

Some of my tags are scaled down versions of my artwork.  Here I've reduced the size of my art and printed it on fine art water color paper.  Punch a hole in the top, add a grommet and thread with silver string.  Think about taking your children's artwork and scanning it into your computer.  Make all your holiday tags out of their artwork.  People will be delighted.

Clay tags by Nelley Kelley

My clay tags are so simple but are probably the most beautiful little tags that I've made.  These can adorn a special little package or can be given as ornaments.  Either way - they will not be thrown out.  I guarantee that they will be saved over the years.  This is a wonderful project to do with your children and isn't limited to the holidays.

cookie cutters

Grab some of your cookie cutters.  The size of the finished tag is totally up to you.

air drying clay

You want to use white air drying clay (not clay that has to be baked in an oven).  Roll out your clay to about 1/8inch thickness.

clay cut outs

Cut out your clay in the shape you like.  Use a tooth pick to put a hole at the top of your cut out so that you can string them up later.  While the clay is still wet, you can press different objects in them or leave them as is.  

printed clay tags

I stamped my clay tags with holiday words and tied on little bells to make them more festive.

clay button tag

Here I pressed a button into the clay for a sweet little gift tag.  Your imagination is your only limit here so have fun.  The clay needs to air dry for a day.  I found that your tags will look best if you turn them over from time to time when they are drying.  You can smooth out the edges with sandpaper but I kind of like the roughened edges because it seems more organic.

Chalkboard gift tags by Nelley Kelley

I used some chalkboard paint to dress up some balsam wood heart shapes that I had leftover from my ornament project.  A quick slick of chalkboad paint, some wire and a little jingle bell and you've got a sweet little ornament, gift tag or place setting (thread a ribbon through and tie around a napkin and you've got a little take home gift for everyone).  

Chalkboard hearts by Nelley Kelley

Jam Jar by Terrain at Styers

While I've got my chalkboard paint out I thought I would try my hand at dip-dying some inexpensive pottery.  I'm using this jam jar that I bought at Terrain.com as my inspiration.  It's lovely don't you think?  I bet we can pull off something just like it at a fraction of the cost and it would be homemade.

Plain white milk bottle

Plain white jam jar

I had these inexpensive white porcelain pieces at home and thought we could turn these into something a bit more special.  I filled a plastic paint bucket with chalkboard paint and then dipped the bottle and jam jar in half way.  I held them over the bucket so the excess would drip off and then I turned them upside down on a piece of paper and let them dry.

my milk bottle chalkboard

My chalkboard jam jar

Look how great these turned out!  I just love them.  They are not perfect but that does't matter.  The character comes from the little imperfections.  Can't you see the milk bottle being put out with Santa's cookies on Christmas Eve?  How about your homemade jam in the jam jar being served with some yummy toast on Christmas morning.  Now these would be sweet little gifts to give.

Winter Wishes

I hope this inspires you to create some of your own little gifts.  You don't have to be super artistic to create any of these things and you don't really need to go out and buy a lot of supplies - many of them you have right at home.  Wishing you a happy December.

see you soon,
Ellen


Tuesday, November 22, 2011

twinkle, twinkle ...

... little star (and heart)
I was inspired by an ornament that I spied in a BHG magazine posting a while back and thought I would put my own creative spin on an ornament or two.  I used some balsam wood hearts and stars and decoupaged them with pieces of vintage sheet music.  German glitter glass creates a warm and shimmery outline to the ornaments.  Lastly, each ornament is topped off with a vintage pearl button and a dangling chandelier crystal to catch the light of your Christmas tree.

Glitter Glass heart and star ornaments

I can't decide whether to hang them from the tree or tie them to packages as an added little something.

Nelley Kelley Ornaments

They look beautiful grouped together.  The German glitter glass is exceptionally shiny  and develops a lovely patina over time.  (unlike glitter which dulls, true glitter glass tarnishes and takes on a worn vintage look). 

ornament kits

I thought I would put together some ornament kits as hostess gifts this year.  It was fun to be out on the hunt for papers, buttons and crystals to add to my kits.  Everything you need to make an heirloom ornament is in the kit (except for the glue).  For those who don't like to make - I've got completed ornaments to give in it's place.  


Inside the tin

Half the fun for me is in the packaging ... 

All the goods you need ...

Inside are the ingredients needed to make a star and a heart ornament.  The only thing needed is glue to decoupage the paper on to the wooden cut-outs and for adhering the glitter glass to the sides.  They are ever so easy to make and look absolutely beautiful when they catch the light.  You could add beads or shimmery jewels instead of buttons or crystals and the shape is totally up to you.  These would make beautiful Valentine's gifts as well.

Letter bundle by E. McHale

With Thanksgiving days away, I'm working fast on this year's holiday card.  I've got a great family photo  from our trip to NYC this past weekend and the card is in the works.  Creating the annual Christmas card is one of my favorite holiday activities.  Wrapping gifts comes in at a close second. 

I wish you all a very Happy Thanksgiving,

see you soon,

Ellen


Friday, November 4, 2011

New Product Peek ...

Nelley Kelley holiday garland

I am happy to share with you a peek at a new little item I am working on for the upcoming holiday season. 

vintage modern aprons by Nelley Kelley

These aren't your Grandma's aprons ... although they do have the vintage vibe going for them.  They are a little more modern for us modern gals.  A half apron that just brushes the knee in beautiful Belgian linen.  Perfect for the stylish hostess who needs a casual cover for her fashionable frocks. 

photos by Ellen McHale

The aprons are 20 inches from waist to knee and have a generous amount of twill tape to tie around your waist. I've included a cute little Nelley Kelley loop on the other side so you can hang your apron on the pantry door.

apron with text

This apron features old text printed on linen.  

Nelley Kelley apron

Vintage mother of pearl buttons anchor each side of the apron strings.  Just a pretty detail because I like pretty details!

apron

my mannequin all decked out in her finery

More to come as this elf gets busy in her workshop creating more special somethings for the holiday season.  I just wanted to share what I am working on right now and get your feedback ...

Happy Thanksgiving garland

One more thing to share ... the above Happy Thanksgiving garland is a great little project to complete in record time.  You need some metal tags from your office supply store, some twine, a little kitchen string and some stamps.  I soaked my tags in some tea to "age" them but you can keep yours bright white if that's the way you roll.  Stamp them with your message of choice and tie the tags onto your twine roping with kitchen string.  

Right now my garland is adorning my mannequin awaiting it's Thanksgiving debut when it will be displayed on an antique cutting board.  It looks ever so cute in person so come on over and take a peek.

Thanks for reading and see you soon,
Ellen


Monday, October 24, 2011

Water Jug Makeover ...

my galvanized tin water jug

Don't you just love a good find?  I was rummaging through a bin over at the Cambridge Antique Market last week and came upon this vintage galvanized tin water jug. For some reason it just called to me.  Maybe the under $25 price tag was doing all the calling.  I thought it might make the perfect prop for my front porch but it needed a little makeover first. 

naked tin in my studio

Here is the tin before I gave it a makeover.  I used some painter's tape to mask off the areas that I wanted to keep paint free.  My thinking was that a little bit of the zinc colored tin would look great peeking out from the new paint job.  It also would keep the vintage vibe that it already had going for it.

all dressed up and ready to go!

I sprayed the tin with flat black enamel spray paint and then carefully peeled away the painter's tape to reveal the galvanized tin.  I like it and think it's ready for it's close up ...

standing sentry with the gourds 

mini makeover complete

I love the extra pop of black to finish off my montage to autumn on the porch.  

Wilson Farm autumn display


Thought you would enjoy an Autumn view of Wilson Farm in Lexington.  Such a great and inspiring  pumpkin display - don't you think?

Enjoy your week and I'll see you soon,

Ellen


Monday, October 17, 2011

Black and White

all photography by Ellen McHale

Black and  White photography can elevate the lowliest of objects to "artwork" status. If you are in the market for some original artwork for your home - why not grab your camera and take a hike? Did you know that you can set your digital camera to "black and white" before you point and shoot.  By starting in a black and white mode, your camera will do all the work for you in terms of settings and light.  If you choose to convert your color photos to black and white via your computer after your photo shoot - you won't always get the quality that you are hoping for.  Take a few moments to get to know what your camera can do for you.  

garden angel

portal to the heavens

Knowing that you are shooting in black and white kind of takes the pressure off of you.  You don't have to worry so much about lighting and color.  You can focus on the object or the shape and line that appeals to your sensibilities.  I think it frees you up in terms of taking a good photograph.  You are free to play.

Kenney Farm Wagon

It is surprising the types of things that look good in black and white.  Rustic, beaten-up objects look divine in monochrome.  Black and white focuses all the attention on form and shape.

crumbly wheel

"s" is for style

rings

When you set out to do a session in black and white you start to see things that your eyes were not open to before.  You begin to look at things from another angle and see art.

tractor seat

tractor seat up close and personal

The tractor seat above would look beautiful blown up and mounted in an oversized matting with black frame.  A collection of "farm" photos would look amazing grouped together on a wall.  Think outside of the box and photograph the suggestion of the item and not the literal translation - this keeps things interesting for you and the viewer.

keeping predators at bay

chain link

a walk in the park

Be open to beauty no matter what form it takes.  A length of chain is just as interesting as the more predictable scenic view of the bridge in the field.  

beans - good for you!

farm stand

don't overlook signs as art

You can pretty much take your black and white photos in almost any kind of lighting. The shadow play is what makes the artwork pop.

tree roots

bench

iron gate

ironwork

All shape is good shape when it comes to creating visually interesting photographs.  Get up close and personal when taking your photo - you will be happy that you did.

a wing and a prayer

bird on pole

a crisp Fall day

Maybe you will be inspired to try your hand at some black and white photography.  Grab your camera and set it for black and white before you leave the house.  Open your eyes to the extraordinary beauty that surrounds us in ordinary things.  Get up close, change your view and snap away.  You will be surprised at how beautiful your photos are.  Blow them up, display them proudly and don't forget to sign the artist's name at the bottom. 

(all photos by Ellen McHale)

see you next week,

Ellen